February 17, 2011

Valentine Sweets

One of the nice things about working for CTP is that I always have cute stuff to do kindergarten projects.  So when Kate came home and said she had to decorate a box for her valentines, I was all over it!  I have hearts of very color and size.  First, we covered the box.  Then, I put glue dots on the back of the hearts and she stuck them on her box. 

When it was all done she took the box to school.  That afternoon I asked her if hers was the cutest box.  (I am all about competition!) She said, "Well it definitely had the most hearts!" 

PERFECT! 
Remember my saying...less is less!  More is more!


So, this is Kate's decorated cereal box. 
I think there are exactly the right number of hearts.


The party was a little "over the top" too. 
 Mrs.  Hill knows that more is more!


The CTP 10" designer cut outs made perfect place mats for an elegant party.  Water served over crushed ice from Sonic  in the tall glasses makes a delicious nectur.


Several dainty sweets were served. 


Each couple was introduced as they entered the room.  They were addressed as Master or Princess.


(I talked to several of the kids from the upper classes later that day.  They could all remember the name of their partner at the kindergarten dance. )


Of course, everyone used their best manners at the elegant party.

So what do you do when you have given the children a ton of sugar??? 
You have a dance and let them work it off!!


YMCA
   
 
Hand-jive!


The Chicken Dance


Girls Just Want to Be Girls!


The Tango!!
What were the parents doing during this elegant party? 
Taking pictures, of course!


Memories are made of this........

February 3, 2011

Sanity Savers....New Products from CTP

Today, I remembered why I live in Texas.  I don't like cold weather!
It has been cold and icy all week. Cabin fever set in on the third snow day.  A sheet of ice covers everything and more snow is forecasted for tonight.  Looks like there will be no school again tomorrow. This afternoon I decided to venture out into the cold.  I got my boots, gloves, hat, and coat from the very back of my closet.  I was ready!  I opened the garage to find a 3-foot ice sculpture had formed from a downspout to the driveway directly behind my car.  There was no moving it....maybe it will thaw by May. I went back inside the house and put all my snow clothes in the very back of my closet. See you in May!

I saw this on Facebook this morning!

Tomorrow is the fourth day.  Don't expect too much from me!


Actually, I did have a few Sanity Savers.  The new product samples from CTP came last week. 
I sat down with scissors and glue
to see what I could do! 
(Oh, dear! I am starting to rhyme.)

 
This is the new bulletin board called Dress for the Weather.  This would be perfect for morning circle time.  You could record the weather using the spinner and then dress the kid appropriately.
He has quite a wardrobe. Look at all the pieces. 

Close this window


This is what I did with it. 
The backboard is magnetic. 
I put magnets on the back of each piece of clothing. 
The dress-up kid is taped securely in place. 

This would be great for a center.  Kate was visiting when I as working on this. She spent at least an hour dressing and re-dressing the kid. 
I added a laminated speech bubble.  You could write different messages from the kid with a dry-erase pen.  Since the piece is laminated you could erase and change the message.


Here is another new bulletin board called Happy Helpers.  This cute helpers chart features monkeys and bananas. 


It is great for tracking your helpers.
But.... 
I always try to look for a different way of using things.  This bulletin board screamed Chicka Chicka to me. 

This again is a magnet board. The chocolate stitch letters have magnets on their backs.  This was another favorite with Kate.  She moved the letters around as she read the book.  Then, she made words with some of the letters.


This bulletin board looks really good with the hot-pink paper for the background. If you use paper on top of your magnet board but sure to use strong magnets so that the magnets work through all the layers of paper.  I used craft magnets attached with glue-dots.


Thanks to CTP for sending me what is new.
With scissors and glue I now have plenty to do!


January 31, 2011

Science Fair


When I was working in our teacher's store, February was Science Fair Time.  It seemed like hundrends of parents came in looking for ideas and help. They were not sure what they were supposed to be doing to help their kids with the projects. 

For several years I was one of the judges for the Science Fair at a local elementary school.  (It is a good thing that is was an elementary school and the projects were relatively simple.  I would never have been able to understand some of the ones done by the older students.)

Here are some suggestions for parents and teachers.

The most important thing is to understand that it is the kid's project.  The concepts covered should be on the level of the child.  He should be able to understand the principles of the experiment.  While he may need some supervision, he should do the work himself.  Choose a project or question that is of interest to the child.

Electrical Circuits are interesting to kids and are easy to construct.

For the electrical energy from a battery to flow out and then come back, there has to be a path for the electrons to follow.  The path is called a circuit.  
If there is a break in a circuit, the electrons won't be able to go all the way around.  A switch is a break in a circuit that you can turn on and off.  Turning off a flashlight breaks the circuit-it stops the electrons from flowing.


This information is from  Switched On  which is a part of the  CTP series called Inside Science. There are 24 books in the series based on national science standards.  The books capture the interest of children in grades 2-6.  The four main branches of science are covered in the series-physical science, life science, earth and space science, and technology.  Each book has information written at the child's level along with experiments that further understanding of the concept.  If you need an idea for a project this is a good place to start.
Close this window

 I found an excellent guide for science fairs on a site called
Science Made Simple.
http://www.sciencemadesimple.com/

Winning science fair projects
What are judges looking for? 
To produce an award-winning science fair project, you need to understand how the judges select a science fair winner. Here are some questions to consider.

Objectives
Is your project full of original and well-thought-out ideas?  Were you clear in describing the problem you are researching?

Skills
Are you knowledgeable about the experiment itself-did you design it and perform the experiments yourself?

Data
Did you record data from the experiment in an organized way?  Pictures, graphs and charts help to explain data.

Interpretation
Did you collect enough data to reach a reliable conclusion?
Science is all about proof.

The Final Presentation
Be sure to use your display while the judges talk to you.  It isn't just a backdrop, it's a visual aid to the information that you've worked so hard to obtain.  Make sure that the board looks good!!!

The final judging is mostly subjective.  While the judges are looking for a few specific things, the way that you represent yourself and your project, and the way the display board looks can make the difference between leaving a poor impression and impressing the judges with your award winning science fair project.
                          
                           
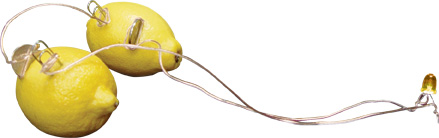
                           A Lemon Battery--No Way!


It's all in the presentation!  That is where CTP can help you create an award winning backboard.  The step by step directions for this  experiment are found in the Switched On  book.  All the decorations for the board are availanle at http://www.creativeteaching.com/ or your local teacher supply store.


When possible add the components of your actual experiment to show that the experiment really works.
Chemical reations are going on between the steel in the paper clips, the copper in the nickels, and the juice in the lemons.  These reactions push electrons through the wires.  This flow of electrons is called an electrical circuit.  This makes electricity, and with the help of the LED, it changed it into light.

The most important thing is to have fun with whatever project you choose.
Then, be sure that the presentation is one that makes you proud!


January 22, 2011

100th Day of School

Close this window
Can you believe that your kids are already
100 days smarter?

The 100th day of school is coming up soon. 
Why not celebrate!
CTP has everything that you need.


Use the 100 cut-outs to make glasses.  Just attach pipe cleaners to each side and connect in the center back.


You can fashion hats and headbands using the 
 100 cut-outs. 
Remember the hats you used to make from newspapers.  Fold the newspaper hats and add 100 of anything. 
100 of any of the mini cut-outs are perfect.


What can you do 100 times?  Each child writes in his own answer on the bookmark.  You can also use them to make great necklaces. Just punch a hole and add a ribbon and the bookmark becomes a necklace.  When the child wears it anyone can see what he can do 100 times.

The headband is made from 10 squares. 
Each square has 10 Hot Spot stickers. 
10 X 10 = 100
You can also practice counting by tens.


Close this window

For more creative ideas to celebrate the 100th day go to the link below.

http://www.creativeteaching.com/t-100thday.aspx

January 16, 2011

Celebrate February

I know I have said it before but......
Making Memories Month by Month is one of my favorite books published by Creative Teaching Press.  The book includes projects for each month of the year. When the children complete the projects for the month the teacher compiles the projects to make a scrapbook for each child.


A scrapbook full of art projects that a child made during the school year is a perfect end of the year gift for the parents. Add a child’s writing samples, math activities, photographs, and projects, and that same memory book becomes a colorful portfolio of the child’s work.

Here is one of the pages for February.  Notice the heart made from the child's hands.  Each month there is at least one project made with the child's hands or feet which makes the book even more special. 


I love the penguin with a heart.  The poem says.....
                                                                                          I had a little penguin
                                     So jolly, fat, and fine.
                                     I pinned a heart
                                     Upon his chest
                                     And named him Valentine!
The pattern for the penguin is in the book plus much more.


For other Valentine ideas check out my post from September 1 called Embellishments of the Heart.

I made a hundred valentines
A hundred did I say?
I made a thousand valentines
One cold and wintery day.

I didn't put my name
On them or any other word.
The valentines were seeds you see,
For February birds!


January 12, 2011

Let It Snow! Let It Snow! Let It Snow!

The eastern part of the United States is blanketed with several feet of snow.  In Texas, even though it is cold, we have had to be content with the few flakes which came down last Sunday.  We didn't even have enough to build a decent snowman!

All of our snow seems to be of the paper variety.  A few weeks ago, I took the grandchildren to the Fort Worth Museum of Science and History.  One of the exhibits concerned snowflakes. 
At this hands-on area everyone got to make his or her own unique snowflake.

All you had to do was follow the directions for the fold and then your cuts make your snowflake unique.

Kate is as unique as a snowflake.  She wore hers as a hat!

CTP has snowflakes that you can play with....even in Texas!
The snowflake cut-outs come in six styles and in three different sizes.  
The one-inch cut out is perfect to embellish any project. Just sprinkle them here and there like falling snow.

You can use the 6-inch cut out to decorate your student's work on a bulletin board...."Unique Work!"

The jumbo 10-inch cut-outs are perfect for books.

Here are a few books made with the different sizes of cut-outs.

To make this classbook use the 10-inch cut-out. Pair up two children.  Each one writes something that is unique about the other.  Put a picture of the child in the center and sentence below.


 Just like a snowflake
Alyssa is unique because she's a good friend .
by Brianna Gomez
  
This is a pop-up book. 
The text is on the outside with a surprise inside the book.


Snowflakes
are one of nature's most fragile things,
but just look what they can do
when they stick together.


This is a step-book that goes with the book Tess Builds a Snowman.
The steps show first, next, then and last.


If you would like to have directions for making pop-up books and step-books as well as many other child-made books check out Bookmaking Bonanza. 


So, Let it Snow! Let it Snow! Let it Snow!


January 9, 2011

Cootie Catchers

                                   Happy New Year
                                                           2011

Last week I was in California at the Creative Teaching Press Sales Team Meeting where the new product for 2011 was introduced.
I am always excited to see the exciting, innovative, and unique products the development team has created. 

                            My Favorite-Cootie Catchers


Remember making Cootie Catchers as a kid? Remember the folded paper and the counting and opening a section to reveal "your true love" or an answer about your future. The creative team has been playing with that idea for a while.  Could something like that be done that would be fun yet educational?
Well, they succeeded! 

Go to http://www.creativeteaching.com/ to see all the new Cooties. Click on new products and then go to Cootie Catchers.  

Remember how to make them??? 


Start with a square piece of paper.  Bring the points to the center.


Turn the paper over and do the same thing.  Bring all points to the center of the Cootie.


Fold it together to make the spaces for your fingers.  If you can't remember how to do this ask any third grade girl.


Now you are ready to move the pieces and ask the questions.


In and out for whatever number of times you say.


Check the question.


Open to find the answer.
  
There are some colorful FUN Cootie Catchers that contain riddles, jokes and fortunes.  Some celebrate holidays like Valentine's Day and Halloween. Another one would make fun favors for birthday parties.  There is one called "Get to know me!" that would be great for the first day of school.

Here are some riddles from the Halloween Cootie Catcher.....
What do witches put on their hair?....Scare spray!
When does a skeleton laugh?....When someone touches his funny bone!
What do ghosts serve for dessert?....Ice Scream!

___________________________________________________________________________

CTP wanted to include an educational twist to the Cooties Catchers.  Kids learn by repetition and practice. Why not make repetition and practice fun? So they came up with books containing Cootie Catchers that kids could make to practice skills in Math, Language Arts, and Science for Grades 2 through 5.  Each book contains 20 Standards-Based Cookie Catchers which provide a fun and unique approach to practicing and reviewing.  Check the CTP website for more information.  


                        Get your Cooties....They are FUN!